Introduction
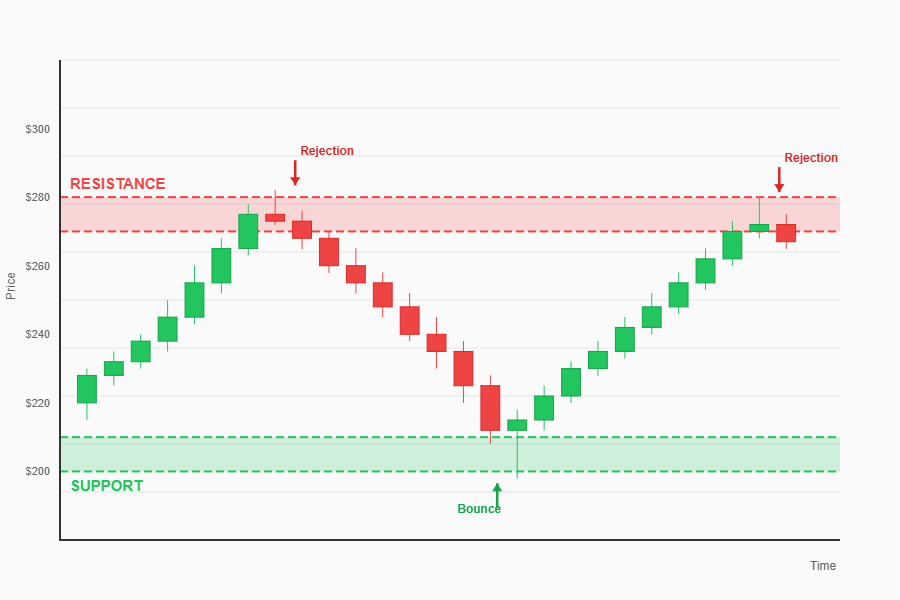
If you’ve ever watched price approach a certain level and suddenly “bounce” or “reject,” you’ve already seen support and resistance in action. These levels are some of the most useful concepts in trading because they help you understand where the market has reacted before—and where it might react again.
Support and resistance are popular because they’re simple: they show areas where buyers or sellers have historically stepped in. But they’re also easy to misuse. Beginners often draw too many lines, treat levels as exact numbers, or assume price must reverse every time it reaches a level.
In this article, you’ll learn what support and resistance are, why they form, how to draw them correctly, and how to use them in real trades—plus the most common mistakes beginners make.
Think of support and resistance as “decision zones,” not magic walls. Price can bounce, break, or hover there—your job is to read the reaction.
What Are Support and Resistance?
Support: The “Floor” Where Price Often Stops Falling
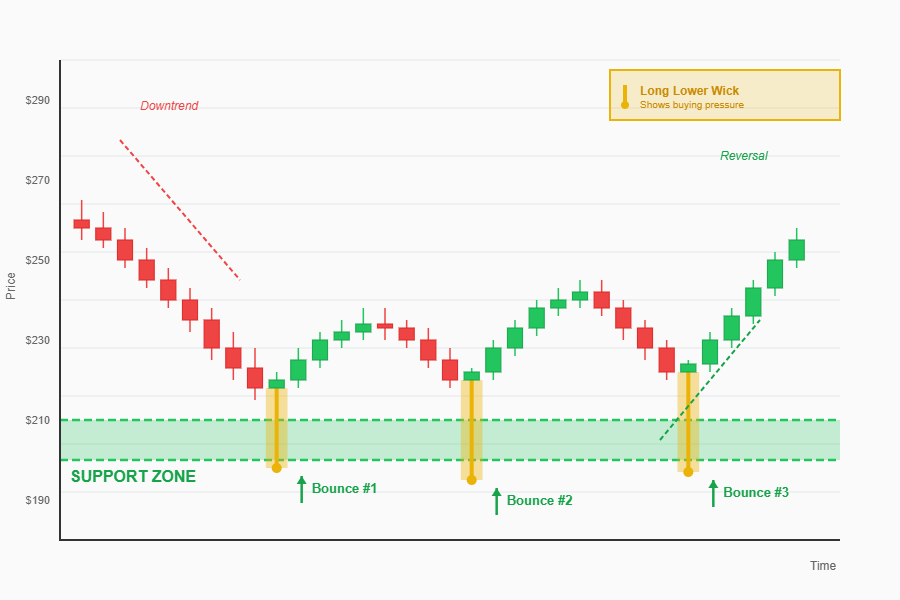
Support is a price area where buying interest has been strong enough to stop price from falling further—at least temporarily. When price reaches support, you’ll often see a pause, a bounce, or a reversal.
Support forms because traders consider the area “good value” to buy, or because sellers take profits and stop pushing price down.
Common signs of support:
Price touches an area and bounces up multiple times
Long lower wicks (candles rejecting lower prices)
A previous low that becomes a “reference point” for buyers
Resistance: The “Ceiling” Where Price Often Stops Rising
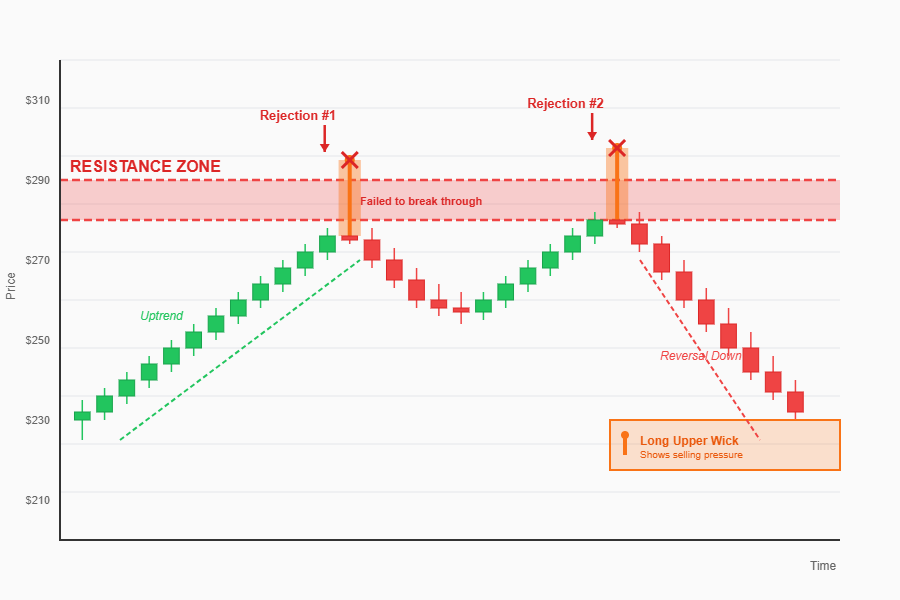
Resistance is a price area where selling pressure has been strong enough to stop price from rising—again, at least temporarily. When price reaches resistance, it may stall, pull back, or reverse.
Resistance forms because traders consider the area “expensive” to buy, or because buyers take profits and sellers step in.
Common signs of resistance:
Price touches an area and drops multiple times
Long upper wicks (candles rejecting higher prices)
A previous high that traders remember and react to
Why Do Support and Resistance Levels Form?
Support and resistance aren’t random. They form because markets are driven by human behavior and order flow.
1) Supply and Demand (Buyers vs Sellers)
At support, demand (buyers) tends to outweigh supply (sellers). At resistance, supply outweighs demand. When the balance shifts, price moves.
Support = demand zone (more buying than selling)
Resistance = supply zone (more selling than buying)
2) Trader Memory and Psychology
Markets have “memory.” Traders remember areas where price turned before:
Buyers who missed the move want a second chance at the same level
Sellers who got trapped want to exit when price returns
Breakout traders watch the same levels as everyone else
That shared attention can create reactions—especially on major levels visible on higher timeframes.
3) Liquidity and Orders Around Key Levels
Big players often need liquidity to enter or exit large positions. Well-known levels (previous highs/lows, round numbers) attract orders:
stop losses
take profits
breakout entries
limit orders
This is why price often “spikes” around a level before choosing a direction.
If a level is obvious to you, it’s probably obvious to many traders—expect more volatility there.
Types of Support and Resistance
Not all levels look the same. Here are common types beginners should know.
1) Horizontal Support and Resistance (Classic)
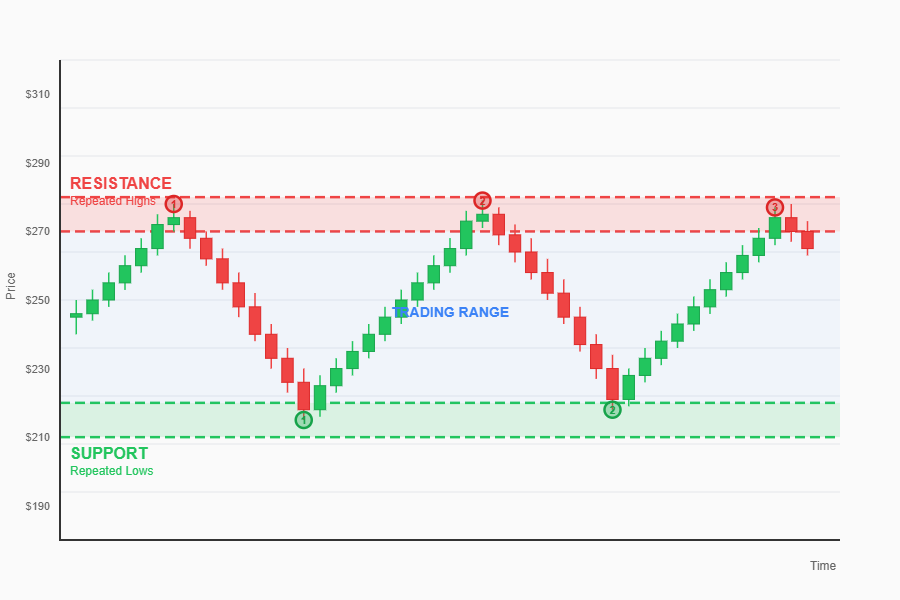
These are drawn as horizontal zones across previous swing highs and swing lows. This is the most beginner-friendly method.
2) Dynamic Support and Resistance (Moving Averages)
A moving average can act like a “moving level.” In trends, price often pulls back to a moving average and then continues.
Examples:
In an uptrend, a 20 or 50 MA may act as dynamic support
In a downtrend, the MA may act as dynamic resistance
Use moving averages as a trend filter first. Dynamic support/resistance works best when the trend is clear.
3) Trendlines as Support and Resistance
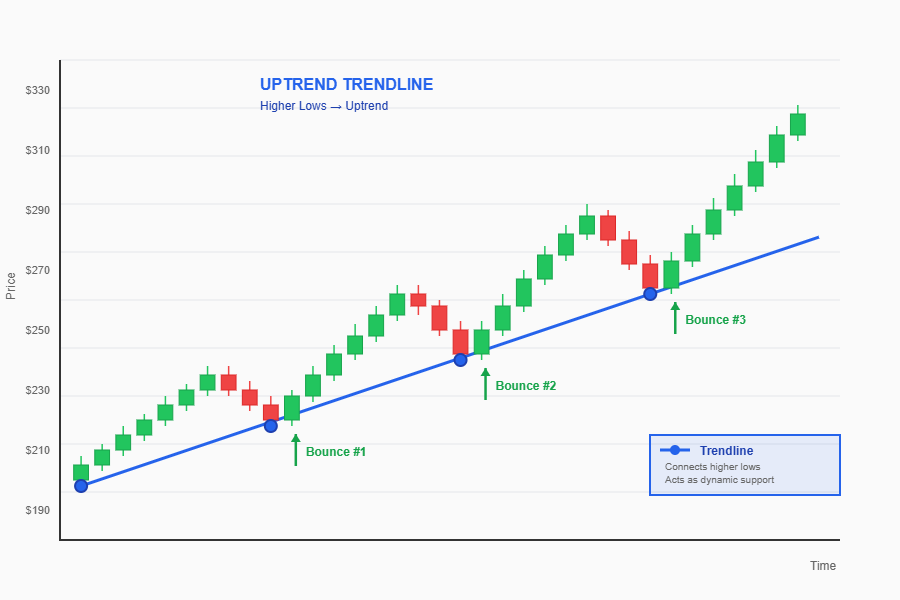
Trendlines can behave like diagonal support/resistance:
Uptrend trendline = diagonal support (connect higher lows)
Downtrend trendline = diagonal resistance (connect lower highs)
4) Round Numbers and “Big Figures”
Levels like 1.2000 in forex or 100.00 in a stock often matter simply because they’re psychologically important and widely watched.
Round numbers attract attention and orders, so reactions are common.
How to Draw Support and Resistance Correctly (Step-by-Step)
This is where most beginners struggle. The goal is not to draw perfect lines—it’s to find meaningful zones where price reacted strongly.
Step 1: Start With a Higher Timeframe
Higher timeframes (daily, 4H) usually give cleaner, more reliable levels than very small timeframes.
Swing trading: start with daily, then 4H
Day trading: start with 4H, then 1H/15m
A level from the daily chart can influence price for weeks or months. A level from a 1-minute chart can become irrelevant quickly.
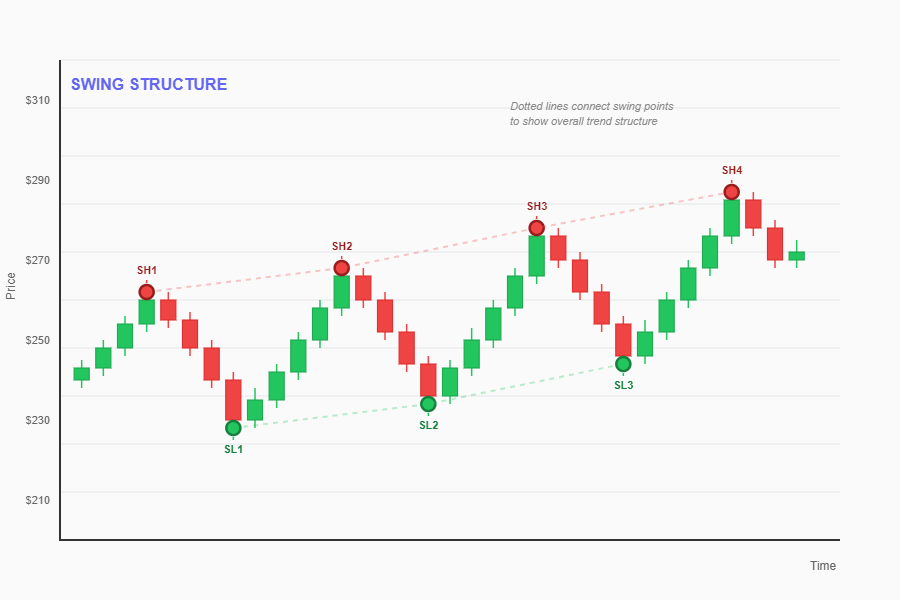
Step 2: Mark Clear Swing Highs and Swing Lows
Swing highs are obvious peaks; swing lows are obvious valleys. These are natural places to draw resistance and support.
Look for:
Strong reversals (sharp bounces)
Multiple touches
Large candles or long wicks showing rejection
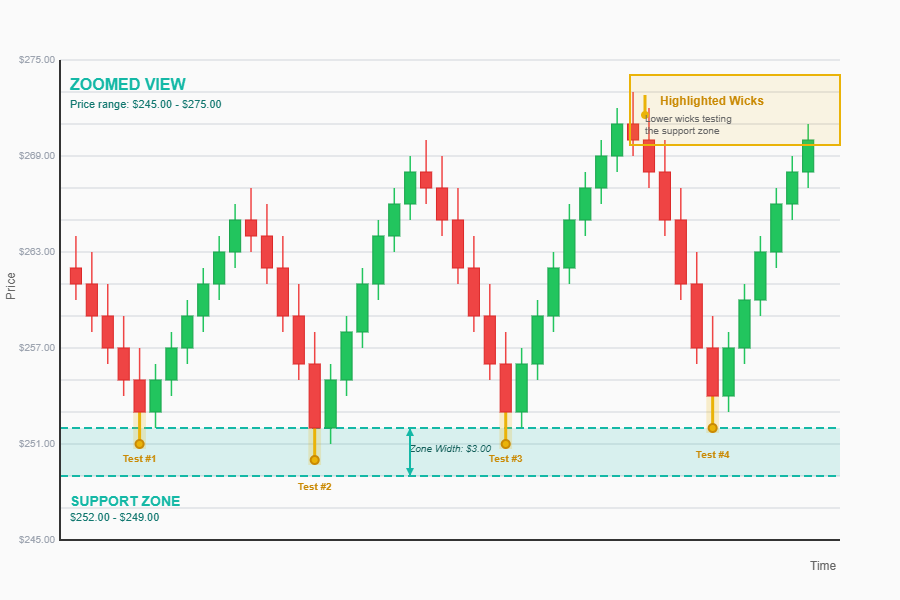
Step 3: Draw Zones, Not Razor-Thin Lines
Price rarely turns at an exact single price. It usually reacts in an area.
How to draw a zone:
Find the cluster of candle bodies/wicks around the swing
Create a band that covers most reactions
Keep it narrow enough to be useful, wide enough to be realistic
Support and resistance work best as “areas of interest,” not exact numbers.
Step 4: Prioritize the Most Important Levels
Too many levels = analysis paralysis. Choose the ones that matter most.
Strong levels often have:
Multiple reactions (touches) over time
Big moves away from the level (impulsive candles)
Alignment with round numbers
Visibility on higher timeframes
If you have more than 6–8 major zones on your chart, you likely have too many. Remove the weakest ones.
Step 5: Watch How Price Reacts When It Returns
A level isn’t “valid” forever. Reactions can weaken after many tests.
When price returns to a level, ask:
Does price reject quickly (strong level)?
Does it slice through easily (weakening level)?
Does it hover and build a base (possible breakout setup)?
How to Use Support and Resistance in Trading
Support and resistance are not a full strategy by themselves, but they are excellent tools for structure, entries, exits, and risk management.
1) Finding Better Entry Points
Instead of entering randomly, traders often wait for price to reach a level and show a reaction.
Common entry idea:
In an uptrend: buy near support (after a bullish reaction)
In a downtrend: sell near resistance (after a bearish reaction)
The key is the reaction—don’t buy just because price touched support.
Wait for confirmation like a bullish candle close, a rejection wick, or a break of a minor structure on the lower timeframe.
2) Setting Stop Losses More Logically
Support and resistance can help place stops where your trade idea is clearly wrong.
Examples:
Long from support: stop below the support zone (not inside it)
Short from resistance: stop above the resistance zone
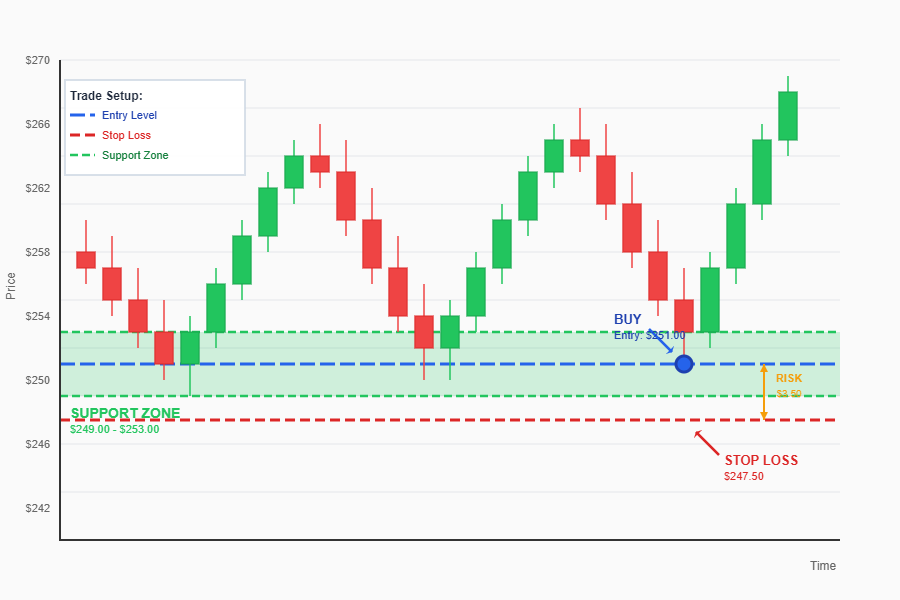
If your stop is inside the zone, normal volatility may stop you out. Give the level “breathing room.”
3) Choosing Take Profit Targets
Levels also help you plan exits. A simple beginner method:
If you buy near support, aim toward the next resistance
If you sell near resistance, aim toward the next support
This is practical because you’re targeting an area where price may react again.
4) Identifying Breakouts and Breakdowns
When price breaks through a level, it can start a new move. But breakouts often fail, so you need a clear approach.
Two common breakout styles:
Aggressive: enter as soon as price breaks and closes beyond the level
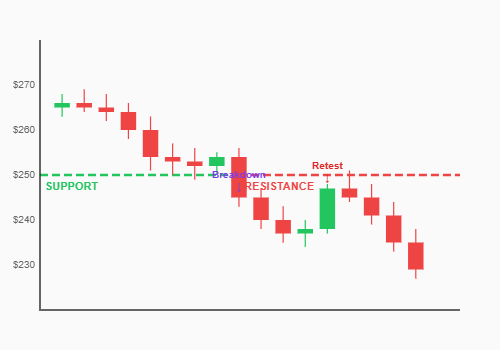
Conservative: wait for a break + retest (price returns to the level and holds)
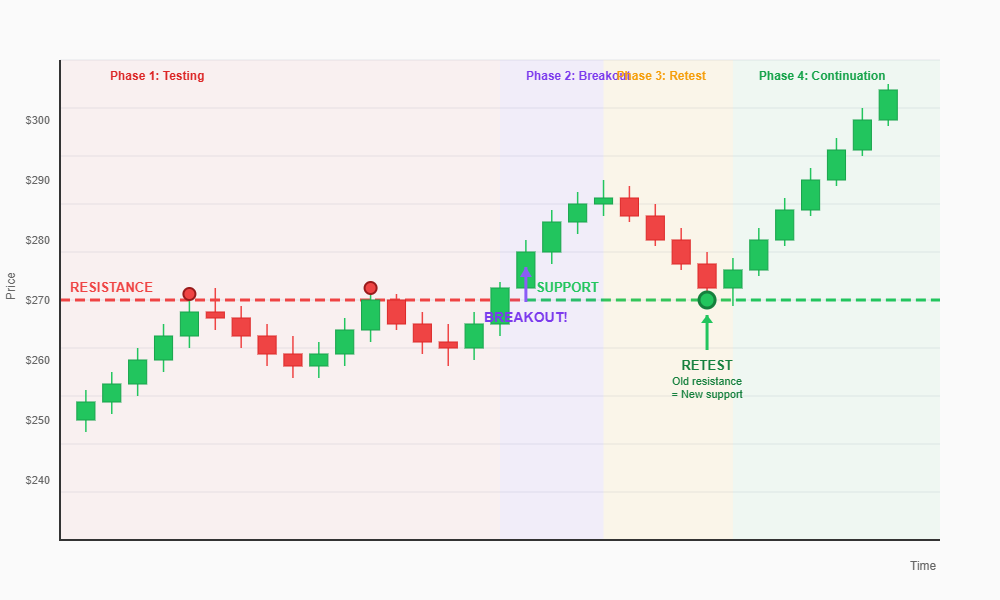
“Break and retest” is one of the most beginner-friendly ways to trade levels.
A true breakout usually holds above the broken resistance (now support). If it falls back quickly, be cautious—it may be a false breakout.
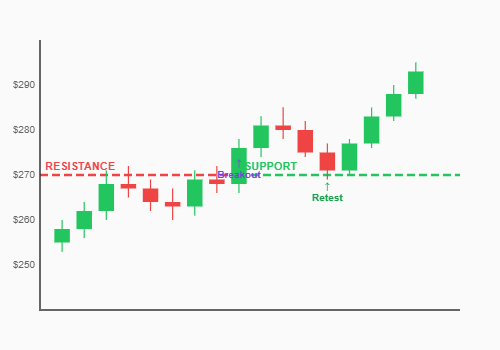
5) Using Role Reversal (Resistance Becomes Support)
One powerful concept is role reversal:
Broken resistance can become new support
Broken support can become new resistance
This happens because traders who sold at resistance may buy back after a breakout, and traders who bought at support may sell after a breakdown.
Common Mistakes Beginners Make
1) Treating Levels as Exact Prices
New traders often draw one thin line and expect price to turn at that exact point.
Reality:
Price often overshoots slightly and then reverses
Wicks frequently pierce a level before bouncing
Zones reflect uncertainty and order flow
If you use zones, your analysis becomes more realistic and less stressful.
2) Drawing Levels Everywhere
If every small bounce becomes a “level,” your chart turns into a maze.
Fix:
Focus on major swings
Prefer higher-timeframe levels
Keep only the zones that price respects repeatedly
3) Entering Without Confirmation
Buying at support without any sign of buyers is risky. The level might break.
Better:
Look for rejection wicks
Wait for a candle close back above support
Watch for a small trend change on a lower timeframe
A level is a location. A signal is the market’s reaction at that location. Don’t confuse them.
4) Ignoring the Trend
Support and resistance work differently depending on trend direction.
Examples:
In a strong uptrend, support levels can hold well; resistance can break more easily.
In a strong downtrend, resistance levels can hold well; support can break more easily.
The trend often decides whether a level is more likely to hold or break.
5) Not Accounting for Fakeouts and Stop Hunts
Sometimes price briefly breaks a level, triggers stops or breakout entries, and then reverses back inside. This is common around obvious levels.
How to handle it:
Wait for candle close confirmation
Use retests instead of instant entries
Keep risk small and consistent
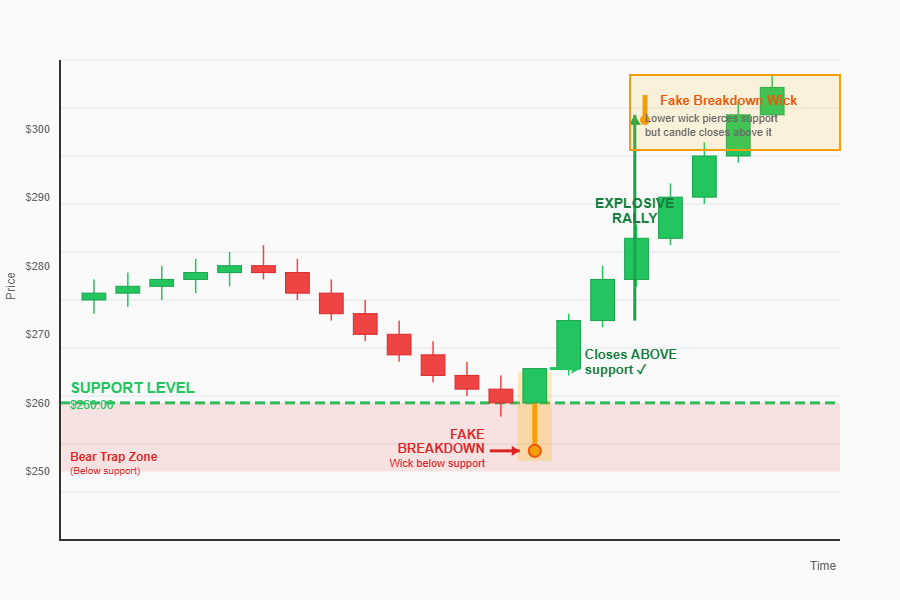
If price breaks a level with a wick but closes back inside, it can be a sign of rejection and a potential reversal.
Conclusion
Support and resistance levels are foundational tools for reading the market. Support is an area where price often stops falling, and resistance is where it often stops rising. These zones form because of supply and demand, trader psychology, and clustered orders—especially around obvious highs, lows, and round numbers.
For beginners, the most reliable approach is simple:
Start on a higher timeframe
Mark clear swing highs and swing lows
Draw zones, not exact lines
Watch the reaction when price returns
Use confirmation, especially in choppy markets
Support and resistance won’t predict the future, but they can help you trade with structure—better entries, smarter stops, and clearer targets.
Practice: Choose one chart and draw only 3 support zones and 3 resistance zones from the daily timeframe. Then drop to 4H and observe how price reacts at those zones. This single exercise builds skill quickly.
