Introduction
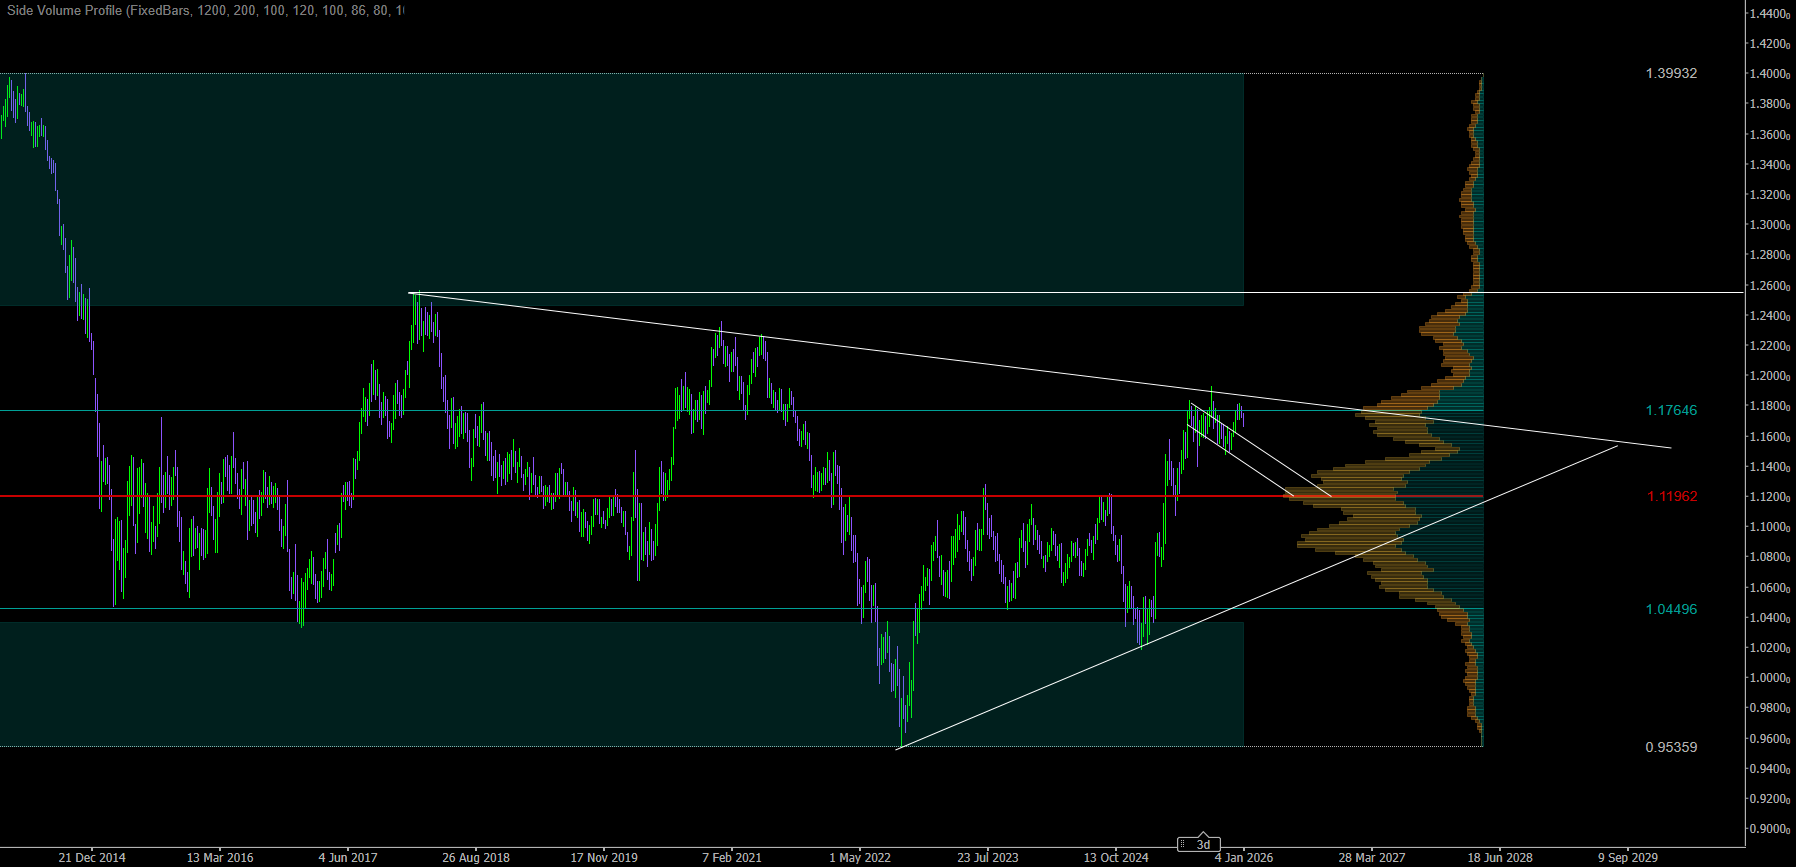
Horizontal volume profiles (also called volume-by-price) answer a simple but powerful question: where did the market actually do business? Instead of only showing volume per candle (vertical volume), a horizontal profile distributes volume across price levels and reveals which prices attracted the most participation.
Traders use horizontal volume profiles to identify “fair value,” spot areas of acceptance vs rejection, and plan trades with clearer structure. When you learn to read profiles correctly, your chart stops looking like random candles and starts looking like a map: high-activity zones, low-activity gaps, and the levels that matter most.
This article explains what horizontal volume profiles are, why they work, and how traders build strategies around them. You’ll also learn practical workflows for entries, exits, and risk—plus how to integrate profiles into your existing trading system.
Near the end, if you want to apply everything with a ready-made tool in cTrader, we’ll briefly mention our company’s solution without turning this into an ad.
What Is a Horizontal Volume Profile?
A horizontal volume profile is a histogram placed across price. Each “row” represents a price band (a bin), and the length of that row shows how much volume traded at that price band over a chosen range.
There are two important parts of that sentence:
1) It is always tied to a range
A profile is calculated over something: a session, a swing, a fixed number of bars, a day, a week, or a custom interval you choose. Change the range, and the profile changes. That’s not a flaw—it’s the point. Different ranges reveal different behavior.
2) It measures participation at price
When a price level accumulates a lot of volume, it typically means the market “accepted” that price—buyers and sellers were willing to trade there. When a price level has very low volume, it can suggest quick movement, poor acceptance, or a “gap” in participation.
Core Profile Concepts You Must Know
Point of Control (POC)
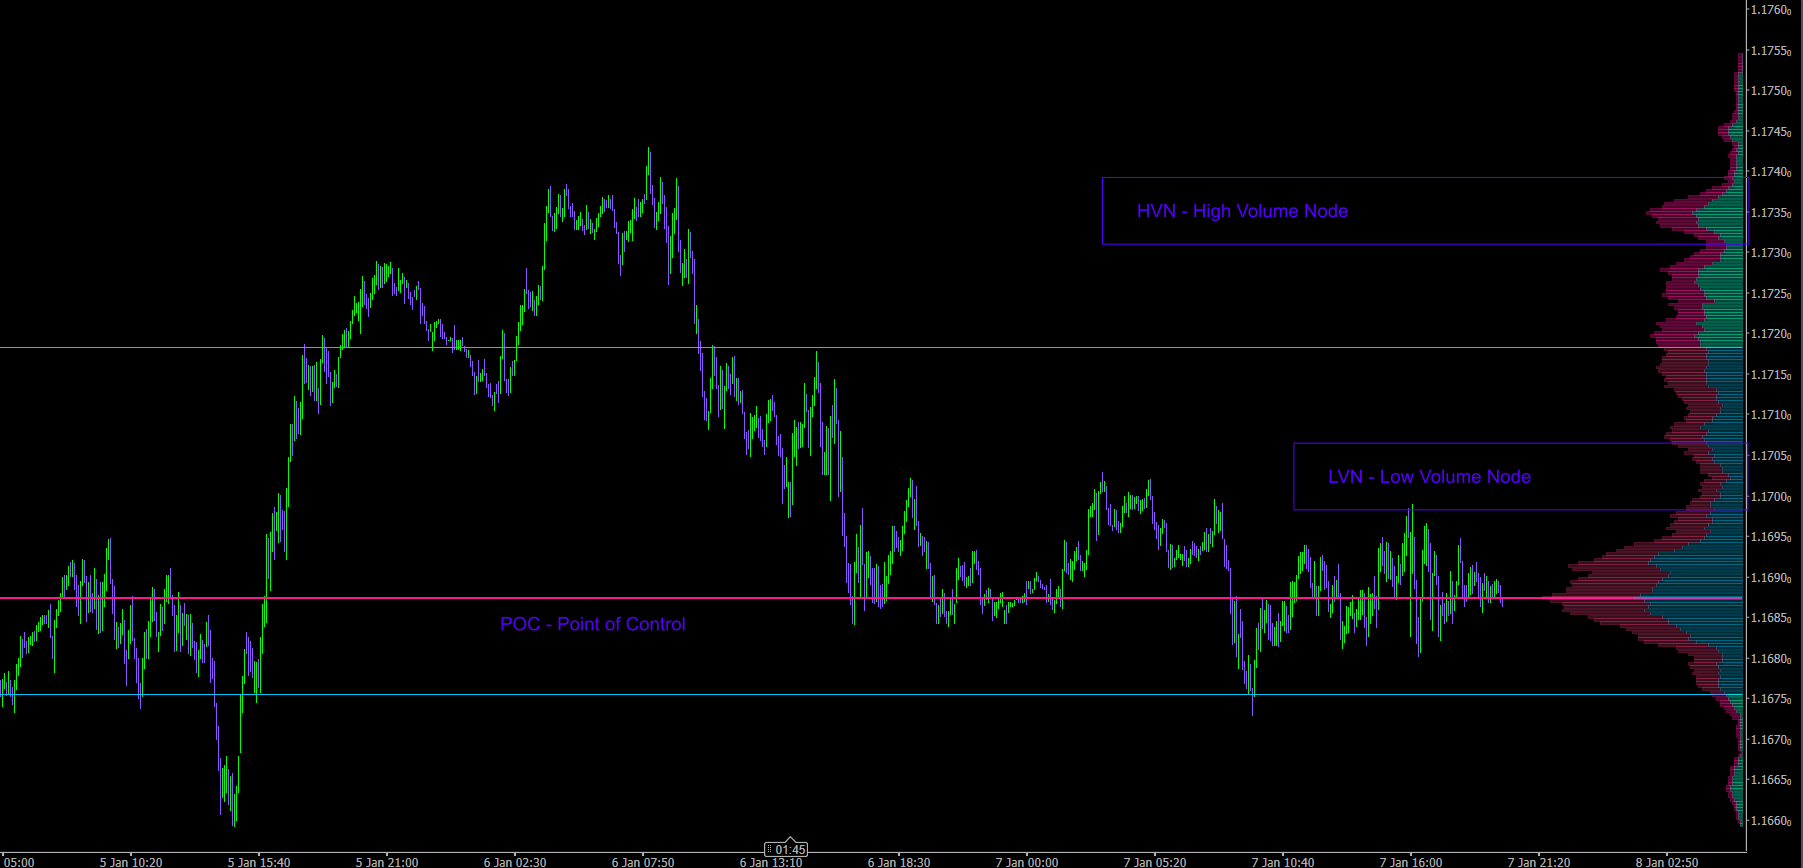
POC is the price level (or bin) with the most volume inside the chosen range. Traders treat POC as a “gravity” level because price often revisits it when conditions are balanced. It can act as a magnet, a pivot, or a decision point.
Value Area (VA), VAH, and VAL
The value area is the region that contains a chosen percentage of total volume in the range (often 68–70%).
VAH is the Value Area High (top boundary).
VAL is the Value Area Low (bottom boundary).
A practical way to think about it: value area is where “most business” occurred. Outside value is where price is more likely to be testing, exploring, or trending.
High Volume Nodes (HVN) and Low Volume Nodes (LVN)
HVNs are “bulges” in the profile—heavy participation zones. LVNs are “valleys” or thin areas—low participation zones.
Common behaviors traders look for:
HVN often behaves like a sticky region: price slows, rotates, and chops there.
LVN often behaves like a fast region: price moves quickly through it, or reacts sharply when it returns.
Acceptance vs Rejection
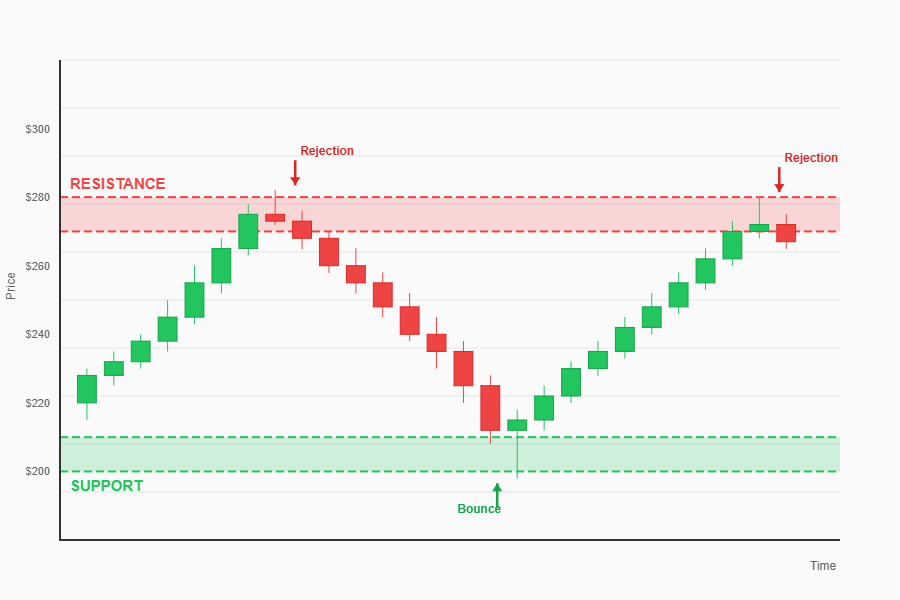
Profiles are not magical support/resistance lines. The edge comes from reading whether the market is accepting a level or rejecting it.
Acceptance looks like: repeated closes around the level, rotation, building volume.
Rejection looks like: quick move away, failed retests, strong directional candles, leaving behind low volume.
Why Horizontal Profiles Work in Real Trading
Horizontal volume profiles work because markets are not only driven by price—they are driven by agreement. A high-volume price level reflects agreement: lots of traders were willing to transact there. A low-volume area reflects disagreement or speed: price didn’t spend time there.
This matters because trading decisions are often about answering:
Where is fair value right now?
Where is the market likely to pause vs move fast?
Where can I define risk clearly?
Profiles help structure these answers. They do not predict the future, but they make your decisions less random.
Choosing the Profile Range
The range is the foundation. If you choose it poorly, your profile can still be “accurate” but not useful.
Common ranges traders use
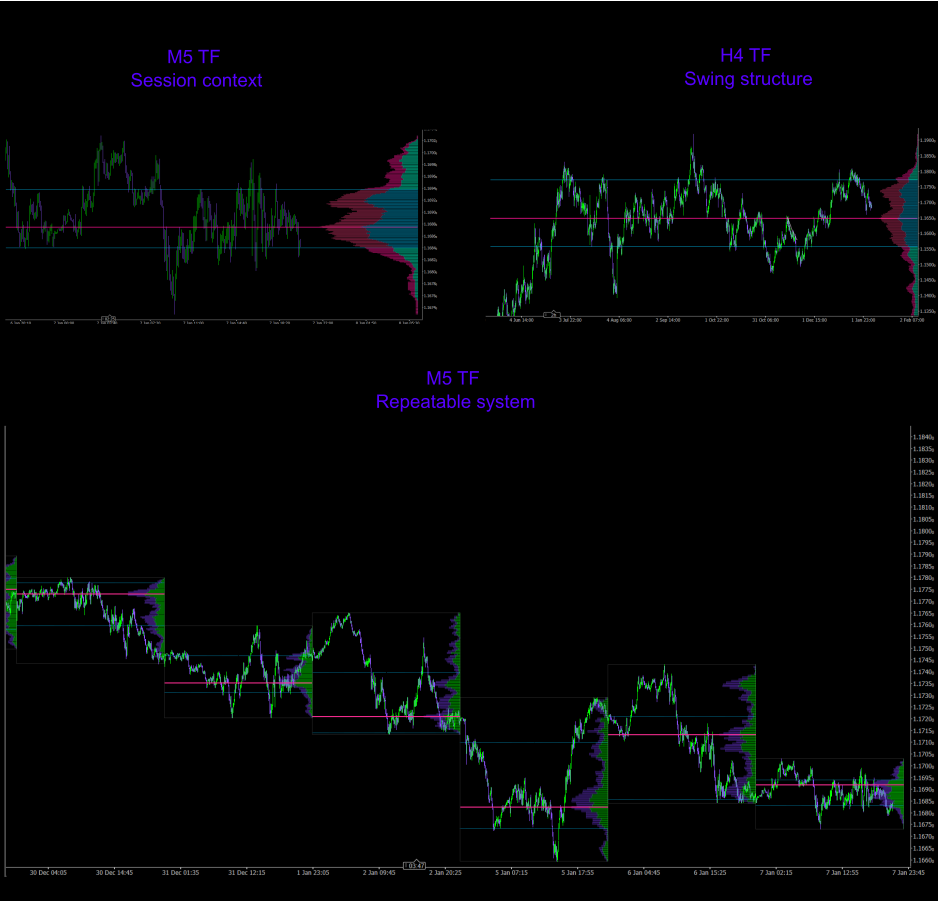
- Session profiles: Using one trading session (e.g., London or New York) to identify session value and pivots.
- Swing profiles: Profiling a clear swing from low to high to understand where that move did business.
- Fixed-bar profiles: Profiling the last N bars for consistency (useful for repeatable strategies).
- Daily/weekly profiles: Profiling a full day or week to identify broader value and major nodes.
A practical rule for range selection
Pick a range that matches your decision horizon. If you trade M5 and hold for 20 minutes, profiling the whole week will be too slow. If you swing trade on H4, profiling only 30 minutes will be too noisy.
How Traders Use Profiles to Build Strategies
Most profile strategies fall into two families:
Balanced conditions (rotation/mean reversion)
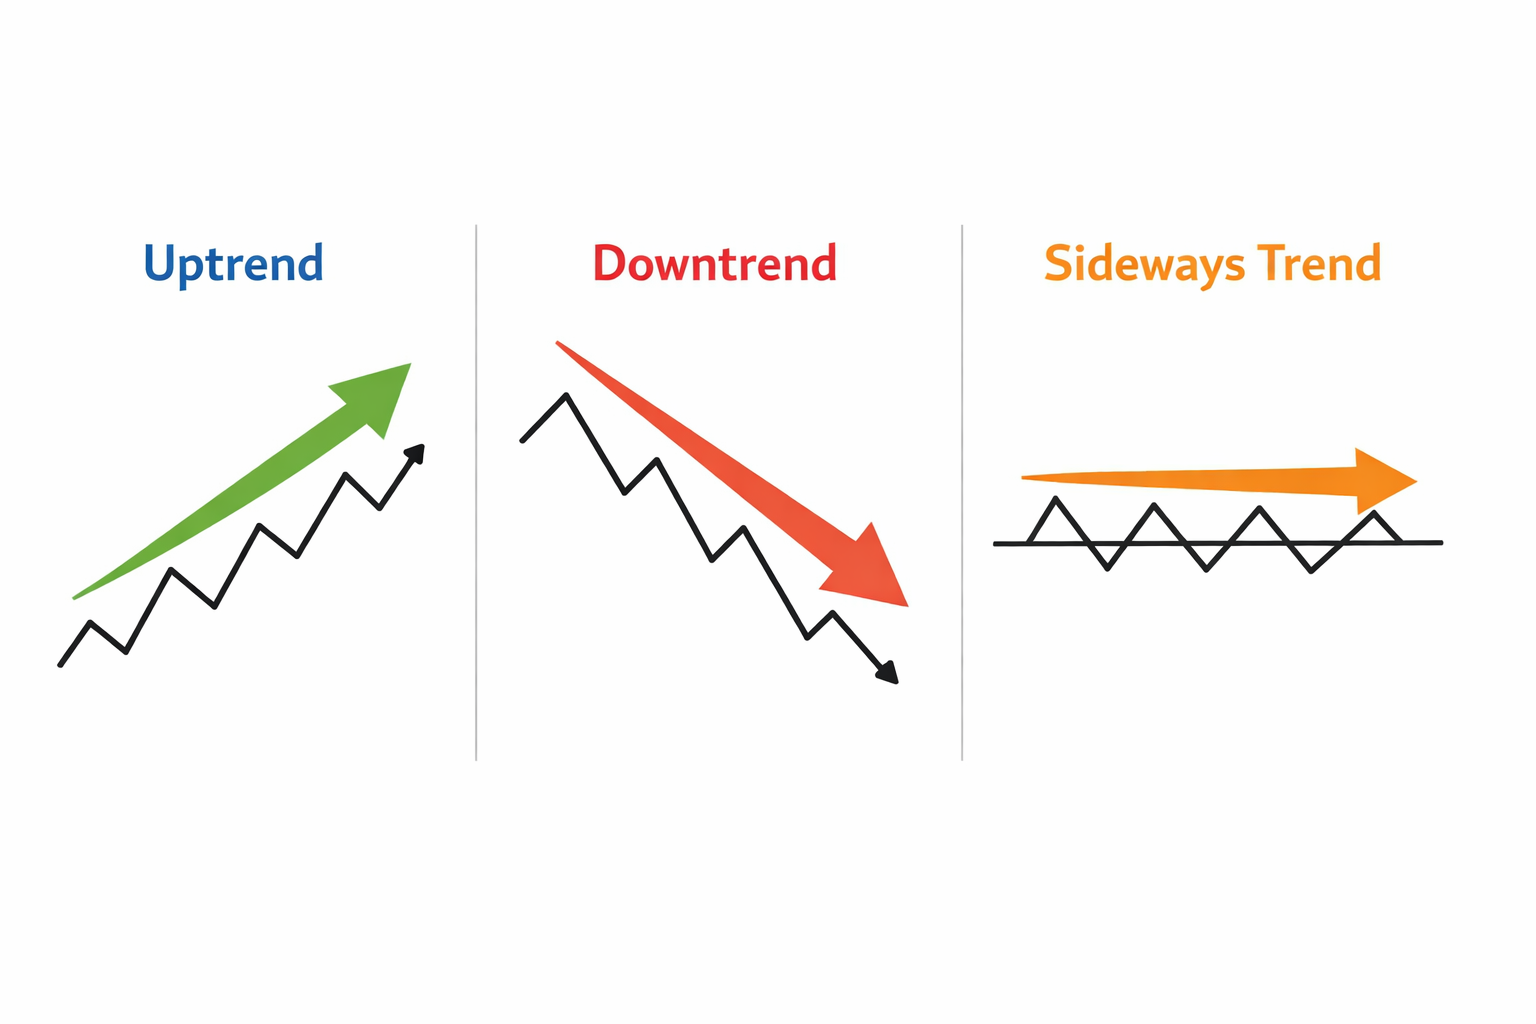
Imbalanced conditions (trend/breakout/continuation)
Your job is to identify which condition is more likely right now and apply the matching playbook.
Family A: Balanced Market Strategies (Rotation Trades)
Balanced markets often rotate between value boundaries and revisit POC. Strategies in this family aim to buy near VAL and sell near VAH, targeting POC or the opposite edge.
Key idea: In balance, value contains price more often than not.
Family B: Imbalanced Market Strategies (Breakouts & Continuations)
Imbalanced markets move away from value and can build new value elsewhere. Strategies in this family aim to trade acceptance outside value, LVN transitions, and pullbacks to prior nodes.
Key idea: In imbalance, price leaves value and builds a new one.
Practical Workflow 1: Value Reversion Trade
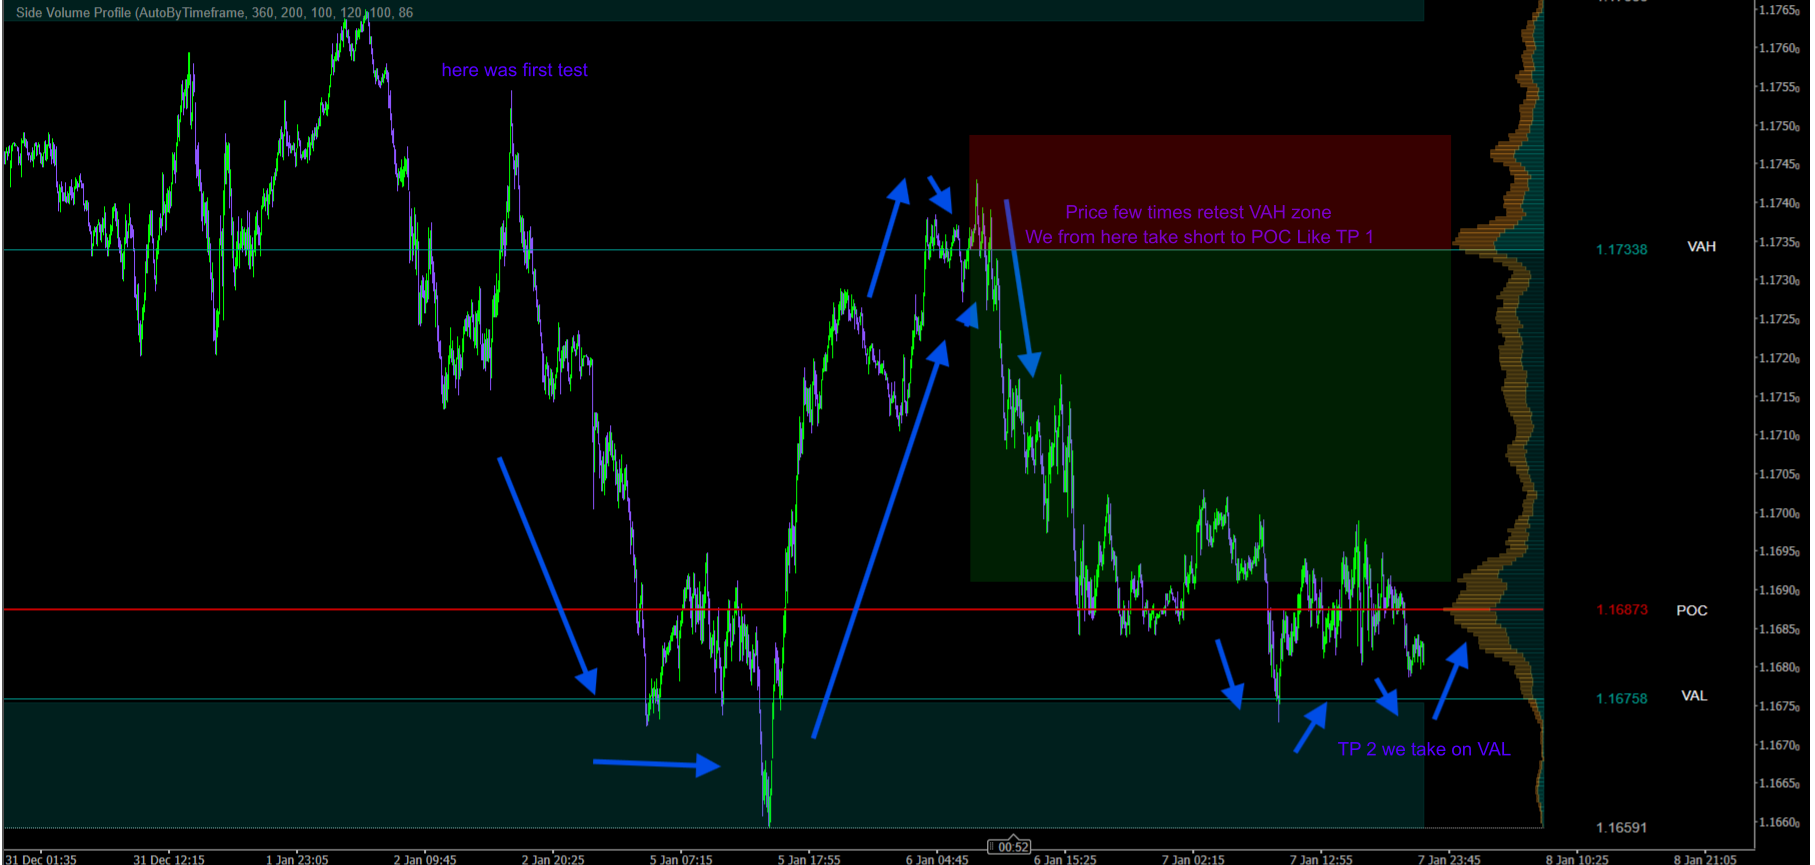
This is the “classic” profile trade: price explores outside value, fails to get acceptance, and returns back toward fair value.
Setup logic
You are looking for a move outside VAH/VAL that does not sustain. The market “tests” the outside, then comes back inside value.
Execution checklist
- Market context: price is not trending strongly, or your trend filter shows neutral conditions.
- Trigger: price trades outside VAH/VAL and then returns inside value.
- Confirmation: the first close back inside value holds (no immediate recapture back outside).
- Entry idea: enter on the return into value or on a small retest of VAH/VAL from inside.
- Target idea: POC as TP1, opposite value boundary as TP2 if rotation continues.
- Risk idea: invalidation beyond the excursion swing high/low.
Why it works
If the market cannot build acceptance outside value, it often rotates back to where the most business occurred. POC becomes the natural “pull” point.
Practical Workflow 2: Acceptance Breakout Trade
This is the opposite of reversion: price leaves value, holds outside, and forms acceptance. You trade continuation after the market proves it wants higher/lower prices.
Setup logic
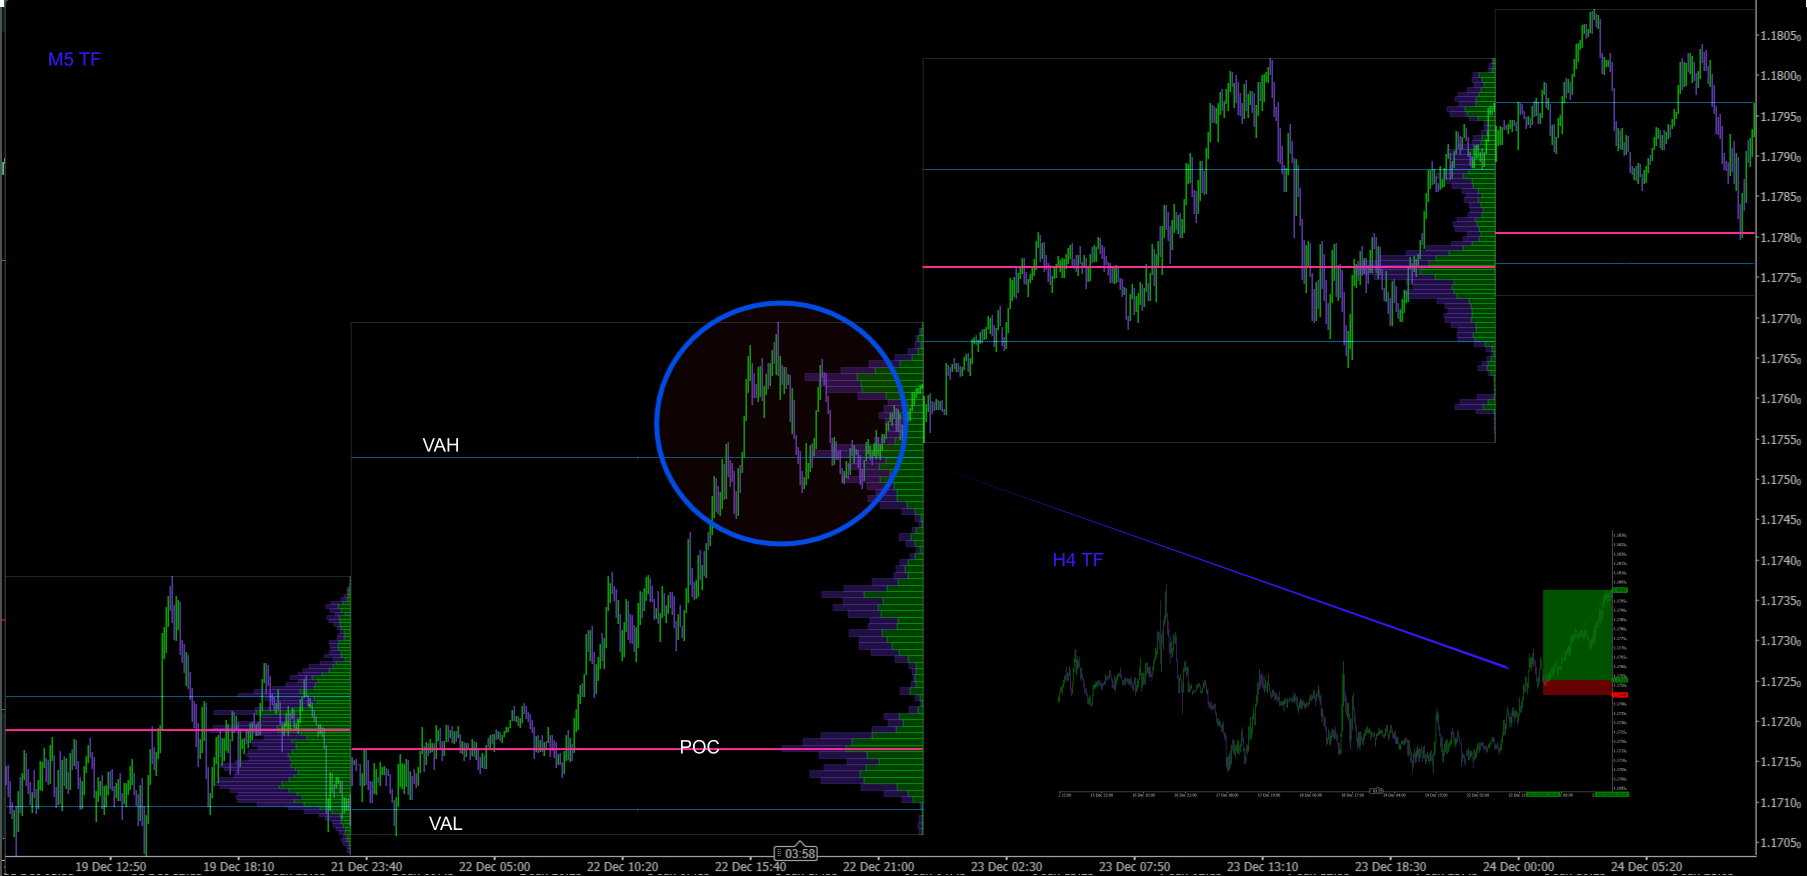
You want evidence that the breakout is not just a spike. The strongest clue is acceptance: repeated closes outside value and/or a successful retest that holds.
Execution checklist
- Market context: trend filter aligns with breakout direction, or higher timeframe structure supports continuation.
- Trigger: price breaks VAH/VAL and closes outside value.
- Acceptance: subsequent candles hold outside; the market does not quickly fall back into value.
- Entry idea: enter on a pullback to the broken VAH/VAL (retest) and hold.
- Target idea: next HVN, prior swing levels, or measured move using the profile high/low of the prior range.
- Risk idea: invalidation if price returns back into value and holds there.
Practical Workflow 3: LVN Transition Trade
LVNs are low-participation zones. When price enters an LVN, it often travels quickly—either straight through or with a sharp reaction.
Setup logic
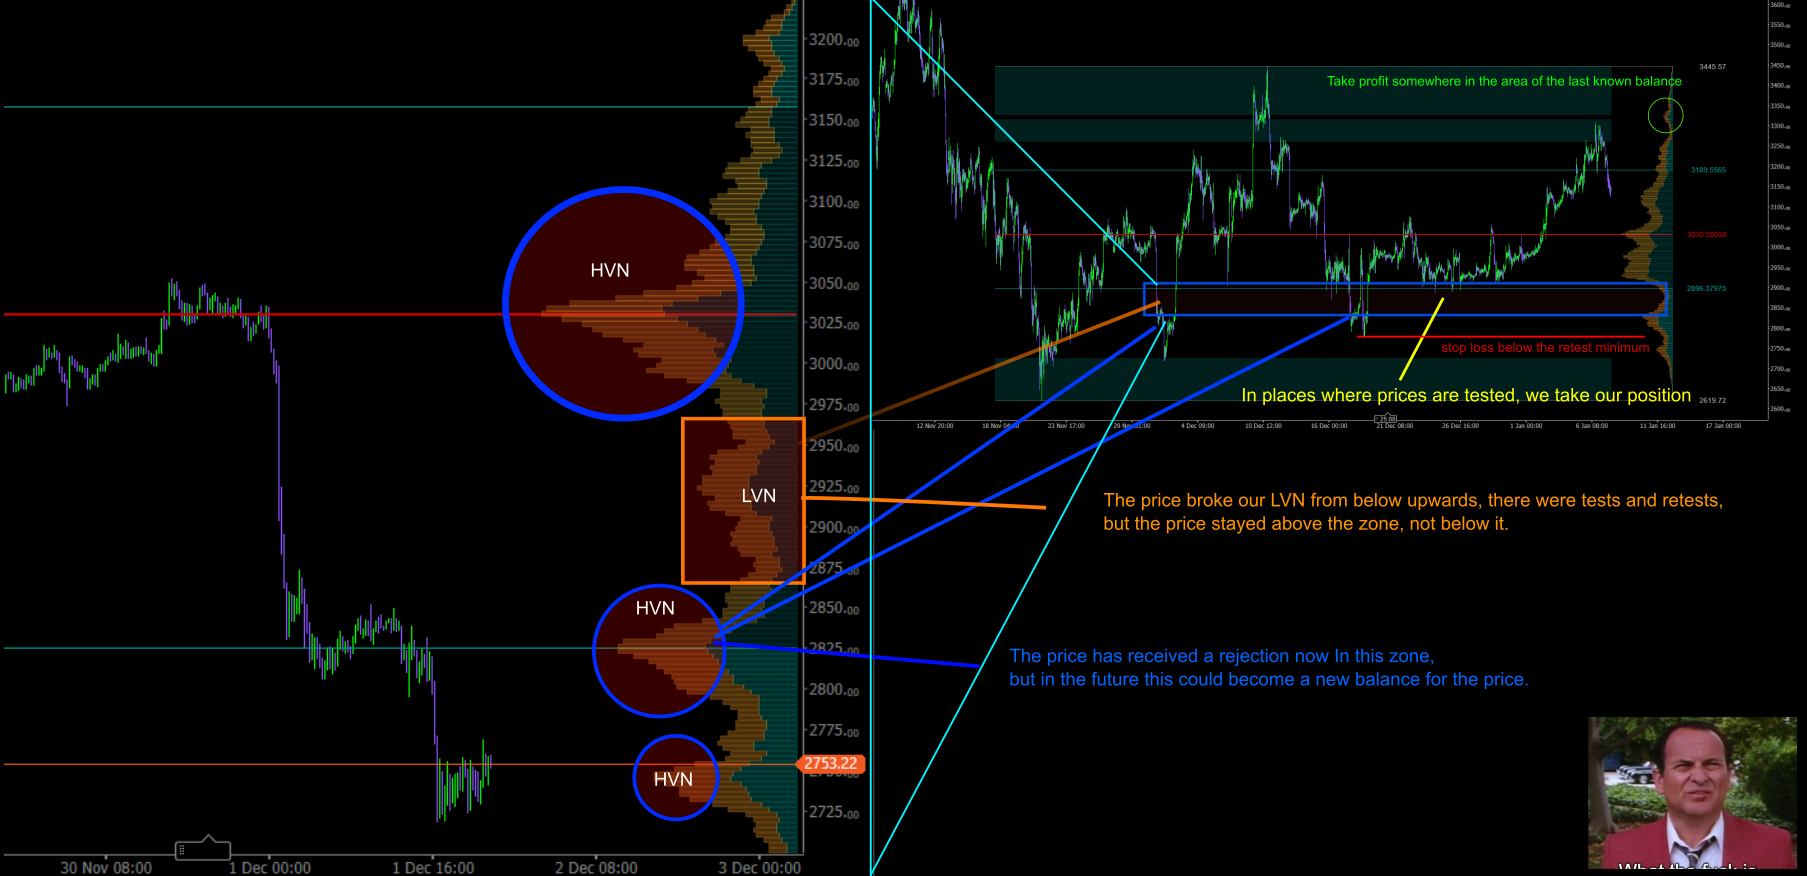
You identify an LVN between two HVNs. The LVN is the “thin zone.” Price often moves faster there because there’s less historical participation.
Execution checklist
- Find an obvious LVN (a valley) separating two HVNs.
- Wait for price to break into the LVN with momentum (not a slow grind).
- Avoid chasing the first candle; instead, wait for a retest into the LVN area.
- Enter when the retest rejects and the move resumes toward the next HVN.
- Target the next HVN as the first logical “sticky” zone where price may slow.
Why it works
The LVN often acts like a “doorway” between two accepted zones. Once price commits, it tends to travel to the next area of acceptance.
Risk Management With Volume Profiles
Profiles give structure, but risk management makes the system survivable.
Position sizing
Use fixed fractional risk. Define your invalidation first (the point where your trade idea is wrong), then size so that a stop-out is a small, pre-decided loss.
Stop placement principles
Stops should sit beyond the structure that invalidates your idea. If your idea is “price is accepted back into value,” then a stop sitting one tick below VAL is often too tight because normal noise can wick it. Consider placing stops beyond the excursion swing, beyond the LVN boundary, or beyond the area that would imply acceptance has failed.
Take profit principles
POC and HVNs make natural partial profit zones because they are likely to slow price. LVNs are often poor places to take profit because price may move quickly through them, meaning you might exit too early.
How to Add Profiles Into Your Existing Trading System
You don’t have to replace your strategy. Most traders get better results by using profiles as a structure layer.
Integration ideas
- If you trade trend following: use profiles to choose pullback zones and targets; trade in trend direction, but use POC/VA edges as structure.
- If you trade support/resistance: replace some arbitrary lines with nodes and value boundaries that reflect real participation.
- If you trade breakouts: use acceptance rules around VAH/VAL and LVN transitions to filter false breakouts.
- If you trade price action: use profile levels as the “where,” and candles as the “when.”
A simple integration framework
- Step 1: Pick one profile range method (session, swing, or fixed bars) and commit to it for at least 30 trades.
- Step 2: Choose one family to start (balanced rotation or breakout acceptance).
- Step 3: Define one trigger, one confirmation, one invalidation, and one target model (POC/HVN-based).
- Step 4: Keep a log: screenshot before entry, after entry, and at exit; note whether acceptance/rejection behaved as expected.
Common Mistakes (And How to Avoid Them)
Mistake 1: Trading every touch of VAH/VAL
VAH/VAL are not “auto-reversal lines.” Require evidence: acceptance or rejection.
Mistake 2: Using a different range every time
This destroys comparability. If you want a repeatable strategy, stabilize your range method.
Mistake 3: Ignoring higher-timeframe structure
A small profile can be overruled by a bigger context. If H1 is trending strongly, M5 reversion trades will be harder.
Mistake 4: Confusing LVN “speed” with “signal”
LVNs describe likely behavior (faster movement), not direction. Direction still needs context and confirmation.
Putting It All Together: A Simple Profile-Based Trading Plan
Here’s a compact plan you can test and evolve.
Plan overview
- Market classification: decide whether conditions are balanced or imbalanced using a trend filter and recent structure.
- Setup selection: in balance, focus on value reversion; in imbalance, focus on breakout acceptance or LVN transitions.
- Entry trigger: choose one trigger only (return into value, retest of broken VA, or LVN retest).
- Invalidation: define the exact condition that makes the setup wrong (return and hold back inside value, failure to hold outside, break back through LVN boundary).
- Targets: use POC and HVNs as “slow zones” for partials; use opposite value edge or next node for runners.
- Review loop: track screenshots and notes, refine only one variable at a time.
A Small Note About Tools
Everything in this article can be applied with any horizontal profile tool that provides POC, value area, and visible nodes. If you trade in cTrader and want a ready-to-use implementation, our company ImperialDelta has its own version. You can find it here: Volume Profile cTrader indicator
That said, the real edge is not the tool itself—it’s the process: selecting a consistent range, reading acceptance vs rejection, and executing a clear plan with controlled risk.
Conclusion
Horizontal volume profiles are one of the most practical ways to add structure to discretionary trading. They help you identify fair value (POC), understand where participation is concentrated (HVNs), and spot where price may move faster (LVNs).
When you combine that structure with a simple market classification (balanced vs imbalanced), you can build strategies that match the environment: rotate inside value when conditions are balanced, and trade acceptance and transitions when conditions are imbalanced.
Start simple, stay consistent, log your trades, and refine one variable at a time. That’s how profile trading becomes a real part of your system—rather than another indicator you “look at sometimes.”
